My Studio Color Theme - Or "Why I Want to Eat My Studio"


ack when I started dreaming of having a studio of my very own about a year ago, I had no idea what color theme I would use. It took me a long time to come up with the wall color, but after I finally did {robin's egg blue}, everything just started to fall into place.

I decided to use some of the items that I'll be creating for my business as a jumping off point, namely the colors in some of my faux desserts - chocolate brown, white, cream, and a touch of red...

I love these canvas storage bins I found at Lowes. Chocolate and vanilla! I hope they can help me maintain some measure of organization.


I went into Hobby Lobby the other day for the sole purpose of buying a chocolate brown Eiffel Tower - and I only left with a chocolate brown Eiffel. Amazing! {though I did put a lot of goodies in my cart to admire while I was perusing the store}. Did you know that I accidentally sat on my Eiffel Tower yesterday? It was on the floor of the studio {yes, for a very good reason} but I had forgotten it was there. I bent down to paint the very bottom of the armoire and then felt a very sharp burst of pain in my...shall we say...upper, upper, upper right leg. I have a scratch and bruise now, ugh! Why didn't I buy the Arc de Triomphe instead?


Originally, I was just going to stick to brown, white, cream and blue - but you know I just couldn't live without red, so I'll be incorporating some lovely red accents. I'll be painting a few things the same color as my kitchen cabinets, Waverly's Cherry.


Of course, there will be some white and robin's egg blue touches. {Yes, I even painted those old books! If it's not breathing, it's fair game!}


I love the thought of spending my days making and looking at these faux candies, though I'd have to keep some real chocolate on hand to satisfy my stubborn sweet tooth.


I'm still loving the glitter magnets I made a while back and will probably have to make more for the kitchen because these are definitely going in the studio!


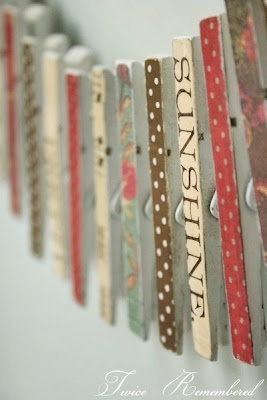
More clothespin love...


In true ME form, this studio is taking much longer than I expected, but it's coming together. I just gave hubs a couple more "honey, can you make this for me" projects {he's thrilled, let me tell you}- so more building for him, more painting for me. Oh, and then there is the tile grout project. More on that later. So there are things we're working on that I don't want to share until the big reveal but hopefully it will be worth the wait.

This may be my last post until we get back from our trip sometime the middle of next week. We leave on Saturday and I have not a little laundry and cleaning to do before our departure. I'm still looking for a vacation package that includes clean laundry and a maid service for home. Let me know if you find it!

Until next time - Au revoir! {which reminds me, hub's mom is in Paris right now...Oh to be her!}
_______________________

This is entry has been included in the Show and Tell Friday event this week at There is No Place Like Home. Hop on over to see all the other lovely Show and Tell items!

33 comments


Make Your Monday {Week One} Add Your Link!


ow it's your turn, dear readers, to share your creative endeavors!

Just follow these 3 simple steps:

1) ~Create or locate one of your blog entries about something you made yourself. It doesn't have to be recent or you could have completed it today - it doesn't matter. *But it must contain a link back to this post at Twice Remembered:

http://twiceremembered.blogspot.com/2009/07/make-your-monday-link-party-today.html


This is so that others can discover this great list of Make Your Monday links and have an opportunity to contribute. If your link disappears, it's because you forgot to add the link. Don't worry, you can just make the adjustment and add your link again. You can grab the Make Your Monday button for your site, too, if you like.

2) ~Add your Blog name below along with a short description of your project

3) ~Add the permalink to your blog entry about your project. Just click on the title of your entry on your blog and then copy the address that appears in the address bar and past it down below. It should look something like this:
http://yourblogname.blogspot.com/2009/07/your_project.html.

It should NOT look like this:
http://yourblogname.blogspot.com/

That's it! I'm looking forward to seeing what you've been up to! Have fun visiting and commenting!

9 comments


Charming Custom Clothespins + Tutorial


{Visit A Soft Place to Land for more great DIY projects submitted by creative bloggers!}

must preface this entry by saying the following:

I♥Clothespins.

Sweet, fun, custom clothespins, that is. You know, the cute ones that are painted and papered and all dolled up just for our sheer viewing pleasure. I've been making them here and there for two or three years now and it just never gets old. Though I never use them to hang clothes, they sure are sweet to use as accessories: piled in a bowl or clear jar, clamped on some horizontally hung wired twine to hold papers, notes, and photos, or you could even attach small rare earth magnets to the back and put them on the fridge. Whatever you do with them, they are sure to add a little something sweet to your home. Here's how you can make your own charming custom clothespins. {If you just want to see my clothespins and skip the tutorial, just scroll down to the bottom}

...And if you want to check out some other great ideas, be sure to visit the other Make Your Monday projects contributed by some very creative and talented bloggers!

{I have say at this point that I am terrible at writing tutorials. Sometimes I'll write like I'm doing the project and sometimes I'll write like you're doing the project. I hope that's not too confusing. Me, You, or Uncle Hank - the instructions should still work for all of us. Hear that, Uncle Hank?}

A few things you'll need: clothespins, spray paint, a wire hanger, a small flat brush, Elmer's glue, and decorative paper {scrapbook paper, wrapping paper, vintage ephemera - whatever strikes your fancy!}. It is helpful to have a paper cutter, but not necessary...you can just use a ruler and scissors instead. Optional supplies are clear spray topcoat, fine glitter, and fine sandpaper.


I like to paint my clothespins before I paper them and I've found that the easiest way to do this is to spray paint them while they are clipped to a wire hanger. I make sure I leave enough space between clothespins so that I can easily spray them. I clip them on in such a way that end of the clothespin is open a bit so that I can spray paint as much of the pin as possible. I straighten the hook of the hanger and use it as a handle. I can easily rotate the hanger with the "handle" to see all the nooks and crannies as I paint. Since you're covering the flat part of the clothespin, you don't have to worry about completely covering that part with paint. It is the sides and the ends that will need the most attention. After I spray the clothespins, I usually stick the hanger in a piece of styrofoam while the clothespins dry. If you want the paint on your clothespins to look distressed, you can sand them at this point. You can even apply another layer of paint in a different color and then sand them so that the first layer peeks through a bit. Or how about going over them with some brown glaze {before or even after adding paper} to make them look worn and old? So many possibilities!


Now we'll move on to the fun part...the paper! For my clothespins, I used a combination of scrapbook paper, old sheet music, and this lovely vintage brown polka dotted gift wrap.


You'll next need to cut out small strips of paper to cover the clothespins. Clothespins are about 3/8" wide and 3 1/4" long. I like to first cut a long strip 3/8" wide, then cut the length I need. It doesn't need to be exact, just so long as it covers most of the clothespin and doesn't overhang too terribly much. {You can cut or sand any excess off later}.


I don't know why, but it thrills me to see all these different tiny little strips of paper, especially when they are all stacked up. Kind of like when it thrills me to see stacks of quilt quarters, though I don't quilt. Or sew. Or anything with a needle.


When the clothespins are dry, run a narrow bead of glue across the flat part of the clothespin and then use the small flat brush to spread the glue to the edges.


And this is the part where the world gets to see my very not so pretty thumbnails.Next, just gently apply the paper to the top, pressing from the center outward to get rid of any excess glue and air bubbles. I did one side of all my clothespins, let them dry completely, then flipped them over and glued the paper to the other side.


I don't like for the paper on my clothespins to look new and crisp. I like for it to look like it's been around for a while. So I take some fine sand paper {150 grit} and gently sand the edges of the paper. You can click the photo below to see what this clothespin looked like after sanding the paper edges.


Optional:
At this point, you can call it a day and be finished with your beautiful custom clothespins, but if you like, you can give them a coat or two of clear topcoat. You can use whatever finish you prefer - matte, satin, or gloss. I think this was the first time I used a finishing spray and I'm not sure if I will again. I ran into a few problems with my topcoat actually changing the color of some of the old giftwrap paper I used {the polka dot paper} due to some kind of weird vintage chemical reaction. Who knew! But it was an easy fix...I just cut some new strips of paper and applied it over the first layer.


Another fun option is to ever so carefully apply glue to the metal spring of your clothespins {the flat brush and/or a toothpick works well} and then glitter it. Hubs especially loved this idea. {Ha!}


So how easy was that? Be warned, making these sweet little things is so addictive. I was just going to make 6 for this tutorial, then I decided on 9, and then 12 - and then "aw shucks, why not make 15?" If you try them, let me know as I would love to see them!

Do you want to see mine? I made them for my studio in the colors I'll be using in there - white, chocolate brown, vanilla, robins egg blue(ish), and red! Here are too many photos of 15 clothespins. {Taking photos of them is just as addictive as making them! Trying to get some photography practice in, too...}


{Here is the one with the glittered spring. I may go back and glitter all of them later. Do you like them better with or without the glitter?}


If you make your own custom clothespin, please let me know as I would love to see them!
_________________________________

Edited to add the link to another wonderful weekly link party, Metamorphosis Monday over at Between Naps of the Porch. Please check it out and be inspired!

45 comments


Newer Posts Older Posts Home
Subscribe to: Posts (Atom)


  • this and that

    • home
    • about
    • FAQ / have a question?
    • blogs of note
    • email

    categories

    • dining room
    • dollhouse
    • exterior
    • food
    • hallway
    • inspiration
    • kitchen
    • living room
    • personal
    • poetry and quotes
    • small projects
    • studio
    • thrifty finds

    search

    memory lane

    • ►  2016 (2)
      • April 2016 (2)
    • ►  2013 (1)
      • January 2013 (1)
    • ►  2012 (4)
      • November 2012 (2)
      • July 2012 (2)
    • ►  2011 (30)
      • November 2011 (2)
      • October 2011 (2)
      • September 2011 (2)
      • July 2011 (3)
      • June 2011 (1)
      • May 2011 (7)
      • April 2011 (4)
      • February 2011 (2)
      • January 2011 (7)
    • ►  2010 (101)
      • October 2010 (2)
      • September 2010 (8)
      • August 2010 (2)
      • July 2010 (5)
      • June 2010 (6)
      • May 2010 (10)
      • April 2010 (10)
      • March 2010 (15)
      • February 2010 (23)
      • January 2010 (20)
    • ▼  2009 (104)
      • December 2009 (7)
      • November 2009 (10)
      • October 2009 (11)
      • September 2009 (10)
      • August 2009 (24)
      • July 2009 (12)
      • May 2009 (16)
      • April 2009 (2)
      • March 2009 (8)
      • February 2009 (3)
      • January 2009 (1)
    • ►  2008 (55)
      • December 2008 (1)
      • November 2008 (8)
      • October 2008 (1)
      • September 2008 (7)
      • August 2008 (2)
      • July 2008 (6)
      • June 2008 (12)
      • May 2008 (11)
      • March 2008 (2)
      • February 2008 (1)
      • January 2008 (4)
    • ►  2007 (65)
      • November 2007 (3)
      • October 2007 (1)
      • September 2007 (4)
      • August 2007 (4)
      • July 2007 (1)
      • June 2007 (4)
      • May 2007 (9)
      • April 2007 (9)
      • March 2007 (11)
      • February 2007 (6)
      • January 2007 (13)
    • ►  2006 (107)
      • December 2006 (12)
      • November 2006 (4)
      • October 2006 (3)
      • September 2006 (4)
      • August 2006 (3)
      • July 2006 (16)
      • June 2006 (16)
      • May 2006 (17)
      • April 2006 (9)
      • March 2006 (7)
      • February 2006 (13)
      • January 2006 (3)
    • ►  2005 (23)
      • December 2005 (6)
      • November 2005 (3)
      • September 2005 (6)
      • August 2005 (1)
      • July 2005 (3)
      • April 2005 (3)
      • March 2005 (1)
    • ►  2004 (4)
      • December 2004 (1)
      • November 2004 (1)
      • October 2004 (1)
      • August 2004 (1)

    as featured in...

    as featured in...

    inspiration

    • Miss Mustard Seed
    • The Graphics Fairy
    • Notes from A Cottage Industry
    • MARLEY and LOCKYER
    • White Living
    • The Gardener's Cottage
    • Air Kiss
    • home and harmony
    • FleaMarketTrixie
    • Burlap Luxe
    • Dreamy Whites
    • Jennys Hem och Harmoni
    • me and Alice
    • French Larkspur
    • an angel at my table
    • Fiona and Twig
    • Welcome to Boxwood Cottage!
    • Ticking and Toile
    • The Painted Hive
    • BELLE BLANC
    • Vita Verandan
    • Et à part ça ?
    • A Country Farmhouse
    • Agnes Shabby Chic
    • Linden Townhouse
    • Vita Ranunkler
    • Cottage Dreamers
    • Modern Country
    • Millas hem
    • LA MAISON DOUCE
    • {oc cottage}
    • BELDECOR
    • Lilla Blanka
    • 52 FLEA
    • Meadowbrook Farm
    • K&K Test Kitchen
    • Hvítur Lakkrís
    • Brabourne Farm
    • Maple & Magnolia
    • The Old Painted Cottage - The Blog
    • white flower farmhouse
    • {Beautiful Nest}
    • The Fairfield House
    • miss gracie's house
    • Crème de la Crème
    • Whimsy by Victoria
    • Faded Prairie
    • between cottage and cabin
    • Spets och snor
    • Faded Plains
    • Barn House
    • frugal farmhouse design
    • Songbird
    • Anettes Hus
    • Un autre été
    Show 25 Show All
  • extra! extra!

    extra! extra!


    my little shop

    kitchen

    kitchen

    studio progress

    studio progress

    small projects

    small projects

    thrifty finds

    thrifty finds

    food

    food

    dollhouse blog

    dollhouse blog

    subscribe

    Posts
    Atom
    Posts
    All Comments
    Atom
    All Comments

    email updates

    Enter your email address:

stay in touch

popular posts

  • Make Your Own Magnet Board
    "Live in the sunshine, swim the sea, drink the wild air" ~ Ralph Waldo Emerson I appreciate everyone's well wishes in my last...
  • Transformation of a Cottage Kitchen Part 2: Antique / Farmhouse Style Red Cabinet Makeover
    K itchen cabinetry. Really, your kitchen cabinetry can be considered one of the major furniture pieces of your home and, to say the least, Y...
  • Make Your Own Vintage Art ... With Nail Polish Remover!
    I know I left you all hanging on Wednesday when I said that I was working on transforming the framed art below with my {not so secret} secr...
  • Everything and the Kitchen Sink: Farmhouse Sink Inspiration Photos
    F armhouse sinks. I don't think I've ever seen one that I didn't love. Usually what first comes to mind when we think of these o...
  • Red Cottage Kitchen Vignettes and Hardwood Photos
    Y ou all left such lovely comments in my last entry about our new hardwood flooring. Thank you! It was a backbreaking job as you may well k...
  • Perfect White Chocolate Chip Cookie Recipe
    I 've been thinking about all of you who are having to endure these huge snowstorms in various parts of the country. How are you faring?...
  • Decoupage Goodness
    D ecoupage. I love it! After my last project that involved decoupaging, I believe I've convinced myself that I want to use old book pag...
  • Photos: Red Cottage / Farmhouse "Antique" Kitchen Cabinets *FINALLY* Complete!
    Get Your Own! | View Slideshow I didn't think I'd ever see the day where I could officially say..."The cabinets are fini...
  • A Cottage Bedroom - The Marmalade Makeover
    H ello friends, and Hello 2013 !  I hope this brand new year finds you and your family happy and well.  We've been chipping away at...
  • A Craigslist Sob Story & Great Uses for Old Windows
    A re you up to a Craigslist sob story? Ok then, get your tissues ready.... I found this huge picture window for free on Craigslist last F...


 cottage guests now visiting

The Twice Remembered Cottage © 2008 Free Premium Wordpress Themes and BlackQuanta | Bloggerized by : GosuBlogger